You’ve seen them in Counter-Strike or maybe a flashy Silat demonstration on YouTube. The curved blade looks mean. It looks cool. But the second you pick one up, you realize it’s nothing like a kitchen knife or a standard pocket folder. If you try to grip it like you're cutting a steak, you're doing it wrong. Honestly, you're probably going to hurt your own index finger.
The karambit is an ancient tool. It comes from Southeast Asia—specifically Indonesia and the Philippines—inspired by the claw of a tiger. It wasn't originally a weapon for "operators"; it was a farming tool for raking roots and planting rice. Because of that history, the way you interface with the handle is specialized. It’s about retention. It's about leverage.
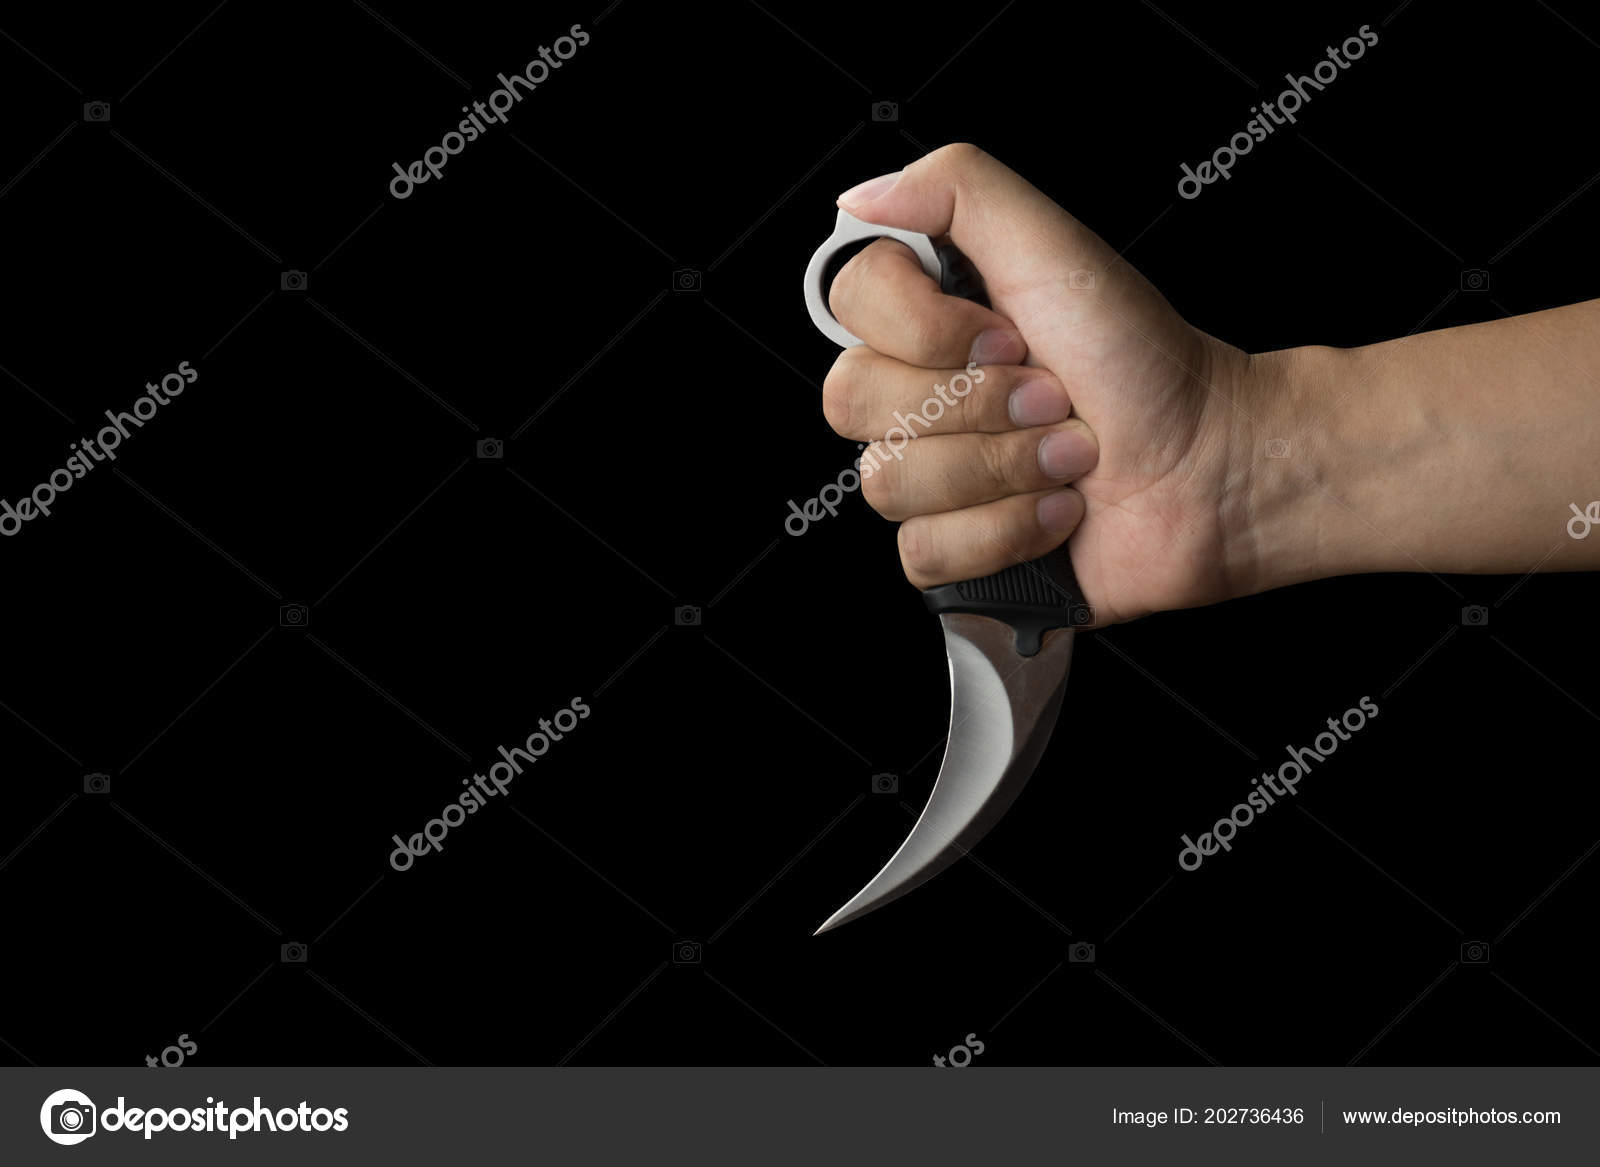
If you want to know how to hold a karambit properly, you have to start with the hole. That safety ring isn't just for show or for doing "tactical" spins that look good on TikTok. It’s the anchor of the entire system.
The basic reverse grip is the gold standard
Most people see a karambit and immediately want to put their thumb through the ring. Don't. That’s a rookie move that limits your range of motion and makes the blade feel clunky.
For a proper reverse grip, which is the most functional way to carry and use this blade, you slide your index finger through the safety ring. Your palm wraps around the belly of the handle. Your thumb then caps the top of the ring or rests on the spine of the handle.
Why do this? Stability.
In this position, the blade extends from the bottom of your fist. It’s incredibly hard for someone to disarm you because that ring is locked around your finger. Even if you open your hand, the knife stays put. Doug Marcaida, a world-renowned edged weapons expert and judge on Forged in Fire, often demonstrates how this grip allows for "fluidity." You aren't just stabbing; you're hooking and pulling.
The reverse grip allows you to use the curved geometry of the blade to its full potential. Think of it as an extension of your natural punching motion. When you move your arm, the tip of the blade follows a devastatingly wide arc. It’s efficient. It’s scary. It’s the way the tool was designed to be used in Silat.
What about the forward grip?
Is there a "right" way to hold it like a regular knife? Yeah, kinda.
You can put your pinky finger through the ring. This is the forward grip. The blade sticks out from the top of your hand, near your thumb.
Some people prefer this for utility tasks. If you're opening boxes or cutting cordage, the forward grip gives you more precision at the tip. But honestly, it feels a bit "off" for many users because the curve of the handle is usually ergonomically tuned for the reverse grip. If you find yourself using the forward grip more often, you might actually just want a hawkbill knife without a ring.
The forward grip is less about combat and more about control. It lets you "choke up" on the blade. Just be careful—if the ring is too small for your pinky, or if you have thick gloves on, transitioning out of this grip is a nightmare.
Common mistakes that will get you cut
Let’s talk about the spinning.
Everyone wants to do the "karambit flip." You see it in movies. You see it in games. In reality? It’s a great way to slice your own forearm or drop your expensive blade on the concrete. Unless you are a highly trained martial artist who has spent hundreds of hours with a blunt trainer blade, leave the spinning to the pros.
- The "Death Grip": Don't squeeze the handle like you're trying to crush it. Your hand will fatigue in seconds. You want a firm but "live" grip.
- The Thumb Placement: If you're in a reverse grip and you put your thumb over the ring, you're stable. If you leave your thumb floating, the knife can wobble.
- Ignoring the Ring Size: Not all karambits fit all hands. If your finger is swimming in the ring, you lose the retention benefit. If it's too tight, you risk "degloving" your finger if the blade gets snagged.
Real-world experts like Steve Tarani, who has literally written the book on karambit use for law enforcement, emphasize that the ring is a safety feature first and a tactical feature second. It ensures that in high-stress situations, or if your hands are wet or sweaty, the tool remains in your possession.
Ergonomics and handle materials matter
When you're learning how to hold a karambit, the material of the handle changes the "feel" significantly. G10 scales are the industry standard for a reason. They have a grippy, sandpaper-like texture that prevents the knife from sliding in your palm.
Cheap "gas station" karambits often have slick plastic handles. Stay away from those. If you can’t get a solid purchase on the handle, the ring becomes a liability because the weight of the blade will cause it to pivot painfully against your knuckle.
Choosing the right size
- Small (Concealed): These usually have 2-inch blades. Great for EDC (Every Day Carry), but the rings can be cramped.
- Medium (The Sweet Spot): Most Emerson or Fox Knives karambits fall here. They fit average hands perfectly and allow for a smooth index finger entry.
- Large (Heavy Duty): These are meant for use with tactical gloves. If you have small hands, these will feel like holding a meat hook.
Transitioning and deployment
How you get the knife out of your pocket is just as important as how you hold it. Many modern folding karambits, like those made by Fox Knives, feature the Emerson Wave. This is a small hook on the spine of the blade.
As you pull the knife out of your pocket, the hook catches the fabric and snaps the blade open. If you do this right, the knife is fully deployed and in a perfect reverse grip before your hand is even clear of your pocket.
It takes practice. A lot of it.
You have to commit to the pull. If you hesitate, the hook won't catch, and you'll end up with a half-closed knife and a very awkward grip. Practice with a trainer blade first. Your jeans (and your thighs) will thank you.
The legal side of the grip
This is the part nobody likes to talk about. In many jurisdictions, the karambit is viewed differently than a standard pocket knife. Because it is "purpose-built" for combat, the way you carry and hold it can have legal implications.
If you're carrying one for self-defense, you need to know your local laws. Some places classify the ring as a "knuckle duster" equivalent. Others see the curved blade as a "dirk or dagger."
Always check your state and local ordinances before you start carrying a karambit. Knowledge is just as much of a tool as the steel itself.
Practical Next Steps
If you’ve just bought your first karambit, don’t start trying to shave your arm or cut cardboard immediately.
- Buy a trainer: Get a dull, unsharpened version of your knife.
- Practice the draw: Work on getting the index finger into the ring and pulling the knife into a stable reverse grip.
- Find your "check": When you hold the knife, your thumb should naturally find a home. Whether it's on the ring or the spine, memorize that feeling.
- Test the retention: With the trainer, have a friend (carefully) try to pull the knife from your hand. You’ll quickly see why the ring is the most important part of the design.
Mastering the grip is the foundation of everything else. Once the knife feels like a natural extension of your hand, the rest—the utility work, the martial arts, the deployment—comes much more easily.