You've seen the video. Gordon is hovering over a heavy-bottomed pan, the steam is hitting his face, and he’s aggressively searing beef while telling you to "get some color on there." It looks simple enough. But honestly, most people who try the Gordon Ramsay short ribs recipe at home end up with something that’s either slightly tough or, worse, a greasy mess that lacks that deep, mahogany glaze he makes look so effortless.
Short ribs are fickle.
They aren't like a ribeye you can just flip for six minutes and call it a day. We're talking about a cut of meat that is essentially a brick of connective tissue and fat. If you don't treat it right, it stays a brick. Ramsay’s method works because it relies on a specific chemical reaction—the Maillard reaction—and a very patient braising process that converts collagen into silk. But if you skip the tiny details, like the tomato paste caramelization or the specific way he handles the mirepoix, you're just making beef stew.
Let's break down why this specific recipe is the gold standard for home cooks who actually want to impress someone.
The Secret Sauce is Actually the Sear
If you think you can just toss the meat in the liquid and hope for the best, stop. Just stop. The Gordon Ramsay short ribs recipe hinges entirely on the first ten minutes.
Most home cooks are terrified of high heat. They see a little smoke and they turn the burner down. That’s a mistake. You want that pan screaming. You need the beef to develop a crust that is almost dark brown—not burnt, but deep. This isn't just for looks; that crust is where the flavor of the final sauce comes from. When Gordon talks about "sealing in the juices," he’s using a bit of old-school kitchen slang that isn't scientifically "true" (searing doesn't actually create a moisture barrier), but it does create the foundational flavor profile for the braise.
Once the meat is out, the pan is covered in "fond." Those little brown bits? That’s gold.
In his Ultimate Cookery Course series, Ramsay emphasizes the importance of deglazing. You aren't just cleaning the pan; you’re incorporating all that concentrated beef essence back into the wine. If your pan is dry or, heaven forbid, you wash it between steps, you’ve already lost the battle.
The Mirepoix and the Tomato Paste Trick
Ramsay’s vegetable base—onions, carrots, and celery—isn't just a side dish. It’s a flavor sponge.
He uses a massive amount of garlic. Usually an entire head, sliced across the middle. It’s a bold move. Most recipes call for two cloves, but Gordon knows that a long braise mellows the garlic out, turning it sweet and buttery rather than pungent. Then comes the tomato paste.
This is the part everyone messes up.
You cannot just stir the paste into the wine. You have to "fry" the paste with the vegetables first. It needs to turn from a bright red to a rusty, dark brick color. This removes the metallic tang and adds a hidden layer of umami that makes people ask, "What is in this?" without being able to point to a specific ingredient. It's subtle. It's genius. It’s classic French technique applied to a rugged British-style comfort dish.
Why Red Wine Selection Actually Matters
Don't buy "cooking wine." Ever. If you wouldn't drink a glass of it while waiting for the timer to go off, don't put it in your short ribs.
Ramsay typically leans toward a heavy, tannic red. Think Cabernet Sauvignon or a bold Malbec. The tannins in the wine interact with the proteins in the beef during the long simmer. It helps break things down. Also, the acidity cuts through the intense fat of the short rib. If you use a thin, wimpy Pinot Noir, the final sauce will feel greasy and one-dimensional. You need something that can stand up to the beef.
The Low and Slow Reality Check
Here is the hard truth: your oven thermometer is probably lying to you.
The Gordon Ramsay short ribs recipe usually calls for a temperature around 170°C (roughly 325°F). But if your oven runs hot, you'll boil the meat instead of braising it. Boiling makes beef stringy and dry. Braising—where the liquid is barely shimmering—makes it melt.
You’re looking for a specific window of time. Usually 2.5 to 3.5 hours.
How do you know it's done? It shouldn't just fall apart when you look at it. If it’s totally shredded, you’ve overcooked it into "pulled beef." You want it to be "fork-tender," meaning the meat yields to a fork with zero resistance but still holds its shape on the plate. It’s a fine line.
- Check at 2 hours: Still tough? Give it more time.
- Check at 2.5 hours: Is the bone starting to peek out? You're getting close.
- Check at 3 hours: The meat should wobble slightly when you shake the pan.
Why Rested Meat is Better Meat
Gordon is a stickler for resting meat, and short ribs are no exception.
When the ribs come out of the oven, they are under a lot of internal pressure. If you pull them out and immediately plate them, the moisture will just leak out, leaving you with a dry piece of fiber. Let them sit in their liquid for at least 20 minutes before serving.
This is also the perfect time to finish the sauce.
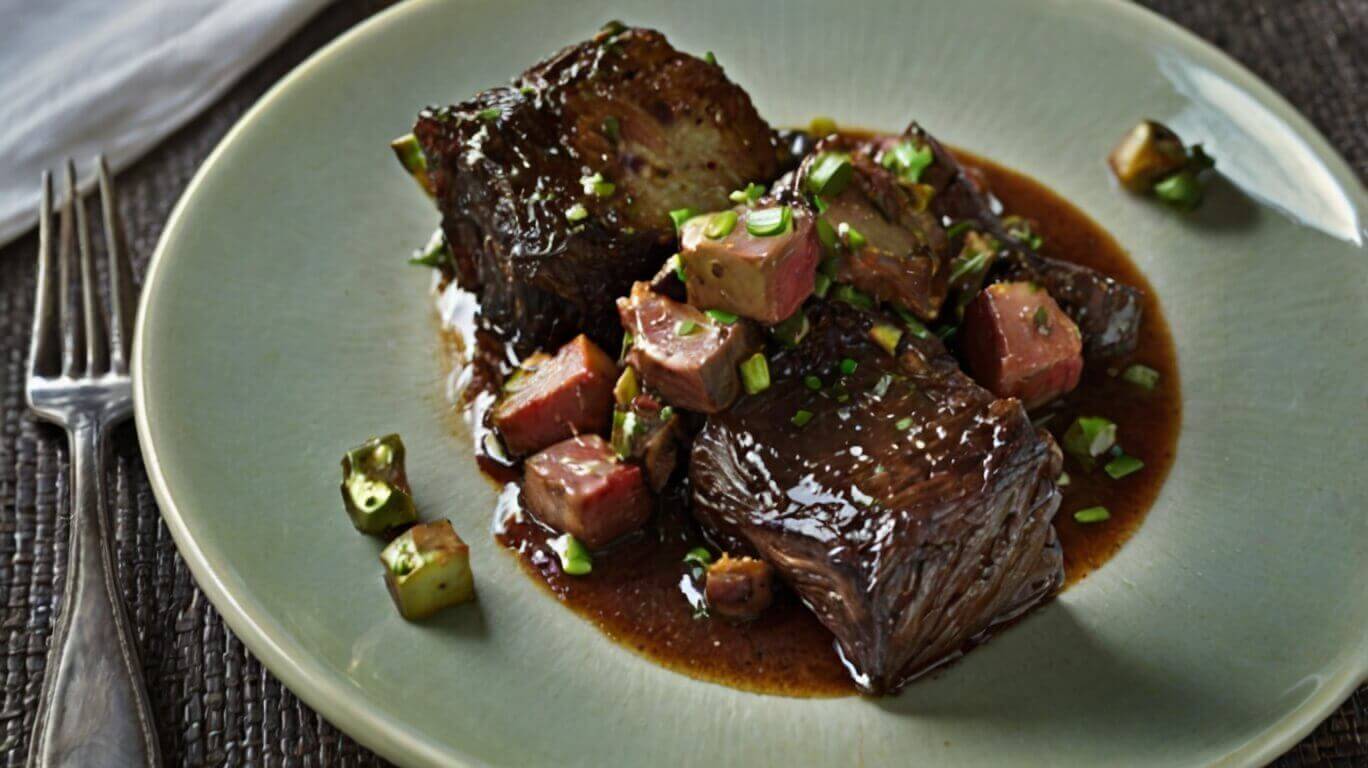
Ramsay’s method involves straining the liquid. Most people skip this because they’re lazy. Don't be lazy. Strain the liquid into a wide saucepan and boil it down until it coats the back of a spoon. This is called a reduction. If you serve the watery liquid straight from the braising pot, it’s a soup. If you reduce it, it’s a glaze.
The difference is everything.
Common Pitfalls and How to Avoid Them
I’ve seen people try to make this in a slow cooker. Just... don't.
A slow cooker traps all the moisture, which means you never get that concentrated, syrupy sauce that defines the Gordon Ramsay short ribs recipe. You also miss out on the top-down heat of an oven, which creates a slight caramelization on the exposed tops of the ribs.
Another big mistake? Using boneless ribs.
The bone is where the marrow is. The marrow provides the body and the "mouthfeel" of the sauce. Boneless short ribs are often just cuts of chuck roast shaped to look like ribs. They’re fine for tacos, but for a show-stopping Sunday dinner? You need the bone. It acts as a thermal conductor, cooking the meat from the inside out while providing essential gelatin to the braise.
The Sides: Keep it Simple
Ramsay usually pairs these ribs with a "pree-purée" (basically a very smooth mashed potato) or a parsnip purée.
The ribs are incredibly rich. You don't need a side dish that's fighting for attention. A simple, buttery mash with plenty of salt is all you need to soak up that red wine reduction. Some people like to add a gremolata—a mix of parsley, lemon zest, and garlic—on top to provide a hit of freshness. It’s not strictly in every version of his recipe, but it’s a pro move that balances the heavy fats.
Mastering the Texture
There’s a nuance to the texture that many recipes ignore.
The fat cap on a short rib can be intimidating. Some people trim it all off. Don't do that. Trim the "silver skin" (that tough, white membrane), but leave a bit of the fat. As it renders during the three-hour bath, it bastes the meat. If you find the final sauce too oily, there’s an easy fix: chill the sauce (or the whole dish) overnight. The fat will solidify on top, and you can just lift it off with a spoon.
Actually, many chefs—Ramsay included in various contexts—agree that braised dishes like this taste better the next day. The flavors have time to marry and the beef absorbs even more of the aromatics.
Actionable Steps for Your Next Braise
If you’re going to tackle the Gordon Ramsay short ribs recipe this weekend, follow this specific workflow to ensure you don't end up with a mediocre pot roast:
- Dry the meat: Use paper towels to get the ribs bone-dry before seasoning. Moisture is the enemy of a good sear. If the meat is wet, it will steam instead of crusting.
- Season aggressively: Use more black pepper than you think you need. The heat of the pepper mellows out during the long cook and provides a nice "bite" to the crust.
- The Wine Ratio: Use a full bottle. Don't play around with half-bottles. You want the ribs to be at least halfway submerged.
- Aromatics: Don't chop your veggies too small. If you're braising for three hours, tiny bits of carrot will turn into mush. Keep them in large, rustic chunks.
- The Glaze Test: When reducing the sauce at the end, use the "nappe" test. Dip a spoon into the sauce and run your finger across the back. If the line stays clean and the sauce doesn't run, it's perfect.
To get the most out of this dish, focus on the temperature of your sear and the patience of your reduction. The magic isn't in a "secret ingredient," it's in the transformation of cheap, tough beef into something that feels like a luxury. Put the phone down, watch the pan, and let the beef take its time. The result is always worth the wait.