You know that specific, salty-sweet crunch of a Payday? It’s iconic. Honestly, it’s one of the few candy bars that doesn't rely on a thick chocolate coating to feel like a "real" treat. It’s just peanuts and caramel. Simple. But here’s the thing: most people think the "caramel" inside is a traditional cooked sugar caramel. It isn't. Not even close. If you try to make a homemade payday candy bar recipe using a standard stovetop caramel, you’ll end up with something that sticks to your teeth like industrial-grade epoxy.
The secret to that soft, slightly crumbly, nougat-adjacent center is actually peanut butter chips and marshmallows.
I’ve spent years tinkering with candy clones. There’s a science to the "chew." When you bite into a commercial Payday, it has a certain give. It’s pliable. By melting together high-quality peanut butter chips and mini marshmallows with a bit of butter, you replicate that exact texture. It’s almost a cheat code. No candy thermometers. No worrying about the "soft ball stage" or burning sugar until your kitchen smells like a campfire gone wrong.
What Most People Get Wrong About the Payday Center
If you look at the back of a wrapper, you’ll see ingredients like corn syrup, sugar, and nonfat milk. It’s basically a modified fudge. Many DIY versions online suggest using condensed milk and butterscotch chips. Don’t do that. Butterscotch is too aggressive. It masks the peanut flavor.
To get the authentic taste for your homemade payday candy bar recipe, you need the salt to hit first, followed by the creamy nuttiness.
I prefer using a 12-ounce bag of Reese’s peanut butter chips—they have the right stabilizer ratio—mixed with about half a jar of marshmallow fluff or a few cups of minis. This creates a "nougatine" that stays soft even after refrigeration. If it gets too hard, you’ve essentially made a brittle, and that defeats the whole purpose of the Payday experience.
Choosing the Right Peanuts
Peanuts aren't just peanuts. Seriously.
If you use cocktail peanuts, they’re too oily. If you use raw peanuts, they’re too bland. You want dry roasted salted peanuts. The "dry roasted" part is crucial because the lack of excess surface oil allows the peanut butter mixture to actually grip the nuts. If they’re too greasy, the center will just slide off the peanut base like a bad toupee.
I usually go with Planters or a high-quality store brand. Check the bottom of the jar for "peanut dust." You want to sift that out. That fine powder will thicken your caramel layer and make it grainy. We want smooth. We want clean.
The Step-by-Step Logic of a Better Homemade Payday Candy Bar Recipe
Most recipes tell you to just "mix and pour." That’s a mistake. You need layers.
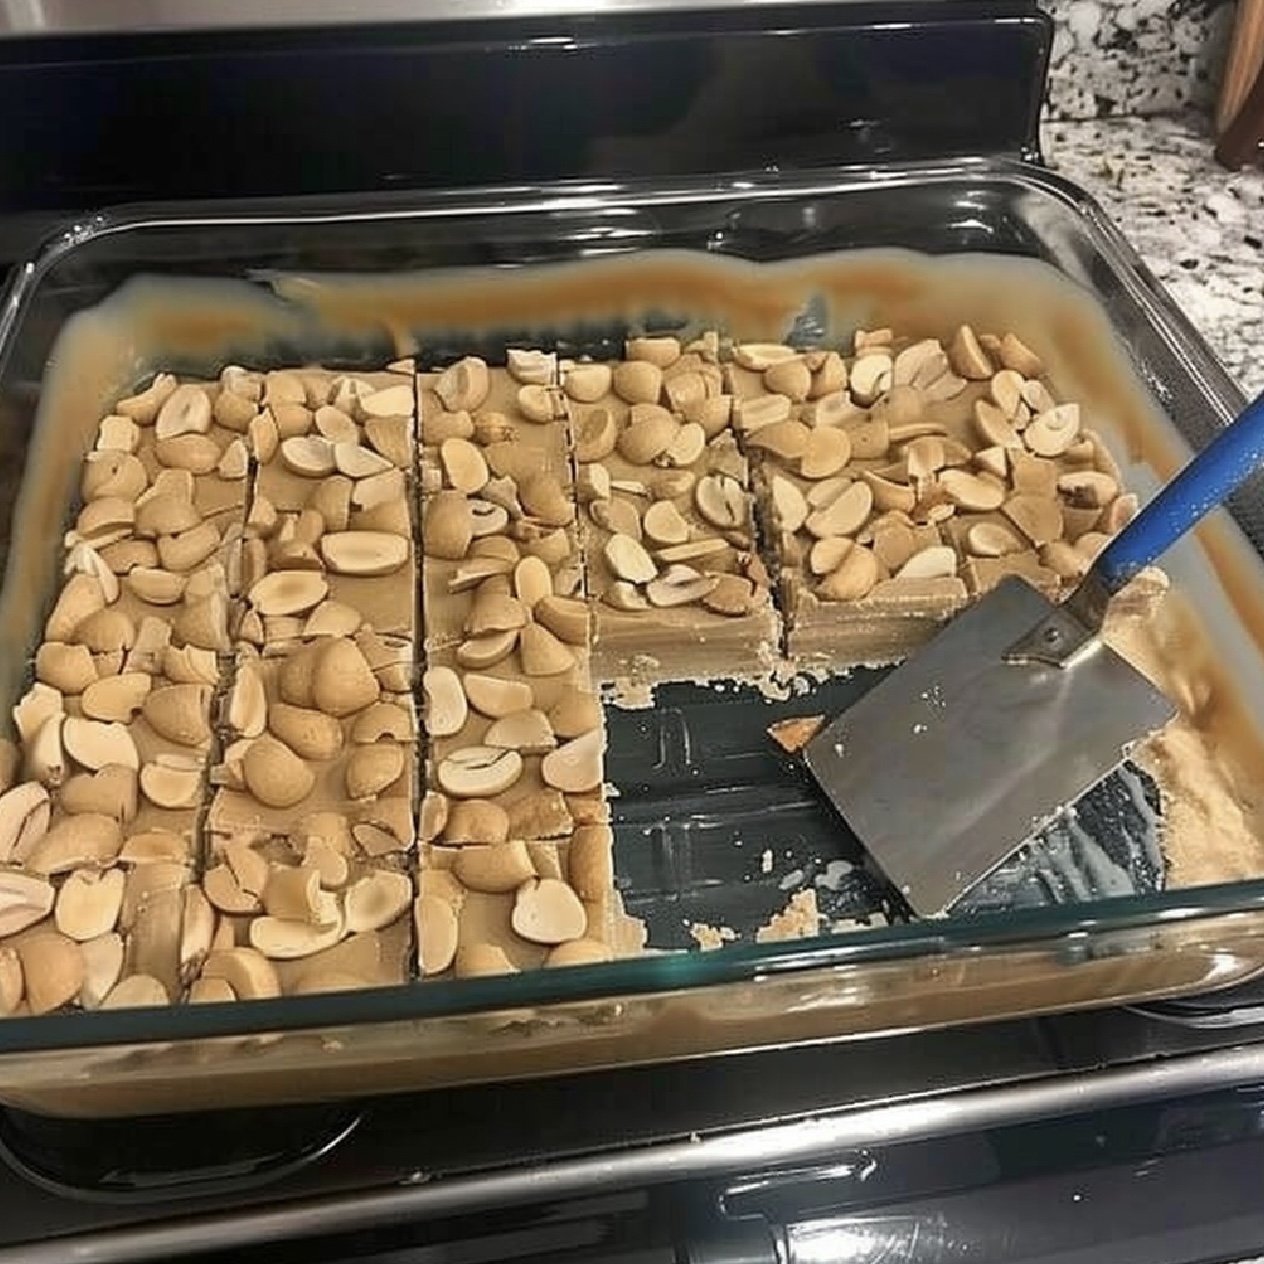
First, grab a 9x9 inch pan. Line it with parchment paper. Leave an overhang. This is your "sling." If you don't use a sling, you will be hacking at the pan with a butter knife for twenty minutes, and you will lose half the peanuts in the process.
The Foundation Layer: Pour about half of your 16-ounce jar of peanuts into the bottom. Shake the pan so they form an even, single layer. There should be no gaps where you can see the parchment.
The Melting Process: In a heavy-bottomed saucepan—or even a microwave-safe bowl if you're feeling lazy—combine 3 tablespoons of unsalted butter, the peanut butter chips, and the marshmallows.
The Emulsion: Heat this low and slow. If you use a microwave, do 30-second bursts. Stir in between. If you overheat peanut butter chips, they "seize." They turn into a dry, clumpy mess that looks like wet sand. You want a glossy, pourable ribbon.
The Pour: Once it's smooth, pour it over that bottom layer of peanuts. Use a spatula to move from the center outward. Don't press too hard, or you'll displace the nuts.
The Topping: Immediately dump the remaining peanuts on top. Now, here is the expert move: press down firmly with the palm of your hand (or a flat-bottomed glass). You need to "seat" the peanuts into the warm mixture so they don't fall off when you slice the bars later.
Why Temperature Matters More Than You Think
You might be tempted to throw these straight into the freezer to speed things up. Resist the urge.
If you chill them too fast, the fats in the peanut butter chips can bloom, leaving white streaks on your candy. Let them sit on the counter for 30 minutes. Let the residual heat dissipate naturally. Only then should you move them to the fridge for about two hours.
When it’s time to cut, use a hot knife. Run your chef's knife under hot water, wipe it dry, and slice. It glides through the marshmallow-peanut mixture like a dream.
Nutritional Nuance and Variations
Let’s be real: this is candy. It’s sugar and fat. But, compared to a Snickers or a Milky Way, a homemade payday candy bar recipe is actually higher in protein because of the sheer volume of legumes involved.
If you are looking for a slightly "cleaner" version, you can swap the peanut butter chips for a mix of almond butter and honey, though the texture will shift toward a "PowerBar" vibe rather than a candy bar.
The "Sweet and Salty" Spectrum
Some people find the store-bought version too salty. If that’s you, use a 50/50 mix of salted and unsalted dry roasted peanuts.
I’ve also seen people add a sprinkle of Maldon sea salt on top before the mixture sets. It adds a sophisticated crunch, but honestly, it’s a bit trendy. The classic Payday doesn't need "finishing salt." It needs quantity.
Common Troubleshooting Tips
- My bars are too soft: You likely didn't use enough peanut butter chips or your marshmallows were too fresh (they have higher moisture). Next time, add an extra 1/4 cup of chips.
- The peanuts keep falling off: You didn't press them into the "caramel" while it was warm. You can fix this by popping the pan back in a low oven (200°F) for three minutes to soften the surface, then pressing again.
- The mixture is grainy: This happens if you used a cheap brand of chips or if you accidentally let a drop of water get into the melting pot. Water is the enemy of melting chocolate and chips.
Scaling the Recipe for Events
If you're making these for a bake sale or a party, double the recipe for a 9x13 pan. They stay fresh at room temperature for about a week if kept in an airtight container. In fact, I think they taste better on day three. The peanuts have time to "cure" into the center, and the salt permeates the sweet layer more effectively.
Most commercial candy bars are loaded with TBHQ and various emulsifiers to keep them shelf-stable for months. Making this homemade payday candy bar recipe allows you to skip the preservatives. You get a brighter peanut flavor and a much more satisfying chew.
It’s one of those rare recipes where the "knock-off" actually stands up to the original. It’s cheaper, it’s faster than going to the gas station, and you can cut them into "fun size" squares or giant "king size" slabs depending on your mood.
Actionable Next Steps
To get the best results on your first try, ensure your workspace is ready before you start melting. Once that peanut butter and marshmallow mixture hits the right consistency, it sets fast.
- Check your peanut inventory: You need at least 16 ounces.
- Prep the pan first: Don't be the person trying to cut parchment paper while your caramel is seizing on the stove.
- Use the right chips: Look for "peanut butter chips," not "butterscotch."
- Sift your nuts: Remove the tiny broken bits and dust for a cleaner look.
- Wait for the cool: Let them set at room temperature before refrigerating to prevent fat bloom.
Keep the bars in a cool, dry place. If your kitchen is humid, the marshmallow component can get a bit tacky, so an airtight glass container is your best friend here. If you're feeling adventurous, try dipping the finished, chilled bars in melted dark chocolate. It's no longer a Payday—it's more like a Baby Ruth—but it’s an evolution worth exploring.